Tuesday, 24 April 2018
Invoice Generator Online
https://next.waveapps.com/ab7fc249-7584-4c96-a75f-6b551ce71b8b/invoices/1003805348/view
Monday, 23 April 2018
Sunday, 22 April 2018
Command to install cPanel & WHM
cd /home && curl -o latest -L https://securedownloads.cpanel.net/latest && sh latestSource: https://cpanel.com/trial/Thursday, 12 April 2018
Wednesday, 11 April 2018
Multiple Upload File with PHP
This is a very simple example:
Part I : HTML
Bekabe Multiple Upload File
Part II : PHP
echo '
$img = $_FILES['img'];
if(!empty($img))
{
$img_desc = reArrayFiles($img);
print_r($img_desc);
foreach($img_desc as $val)
{
$newname = date('YmdHis',time()).mt_rand().'.jpg';
move_uploaded_file($val['tmp_name'],'uploads/'.$newname);
}
}
function reArrayFiles($file)
{
$file_ary = array();
$file_count = count($file['name']);
$file_key = array_keys($file);
for($i=0;$i<$file_count;$i++)
{
foreach($file_key as $val)
{
$file_ary[$i][$val] = $file[$val][$i];
}
}
return $file_ary;
}
Part I : HTML
Part II : PHP
echo '
';
$img = $_FILES['img'];
if(!empty($img))
{
$img_desc = reArrayFiles($img);
print_r($img_desc);
foreach($img_desc as $val)
{
$newname = date('YmdHis',time()).mt_rand().'.jpg';
move_uploaded_file($val['tmp_name'],'uploads/'.$newname);
}
}
function reArrayFiles($file)
{
$file_ary = array();
$file_count = count($file['name']);
$file_key = array_keys($file);
for($i=0;$i<$file_count;$i++)
{
foreach($file_key as $val)
{
$file_ary[$i][$val] = $file[$val][$i];
}
}
return $file_ary;
}
Monday, 9 April 2018
Setting Tanggal dan Jam di Linux
To have the correct time and date in Linux is very important, a lot of things depends on it. It does not matter if you are using Linux to power your personal computer or you have a Linux server. The server and system clock needs to be on time.
Set date from the command line
date +%Y%m%d -s "20120418"
Set time from the command line
date +%T -s "11:14:00"
Set time and date from the command line
date -s "19 APR 2012 11:14:00"
Linux check date from command line
date
Will show you something like this:
Thu Apr 19 15:17:34 BOT 2012
Set hardware clock
The hardware clock is the clock that runs in you PC hardware even if you disconnect it from the main power supply. This is because it has a lithium battery in the modern computers and another type of battery in the old ones.
We'll see differences between hardware clock and system clock
hwclock --show
Will output something like this:
Thu 19 Apr 2012 03:23:05 PM BOT -0.785086 seconds
Now check the system clock
date
Will output something like this:
Thu Apr 19 15:26:41 BOT 2012
Let's set the hardware clock to local time:
hwclock --set --date="2012-04-19 16:45:05" --localtime
If you want to set it to UTC time use:
hwclock --set --date="2011-04-19 20:45:05" --utc
Set the timezone
To set the timezone of your system clock do the following:
cp /usr/share/zoneinfo/America/La_Paz /etc/localtime
Choose the right timezone for you.
Automatically adjust your computer clock
To have your system to automatically adjust time we need to install
ntp. Get it from your repository. Once installed you can configure it this way:
Edit the file
/etc/ntpd.conf. It will look like this:# With the default settings below, ntpd will only synchronize your clock.
#
# For details, see:
# - the ntp.conf man page
# - http://support.ntp.org/bin/view/Support/GettingStarted
# - https://wiki.archlinux.org/index.php/Network_Time_Protocol_daemon
# Associate to public NTP pool servers; see http://www.pool.ntp.org/
server 0.pool.ntp.org
server 1.pool.ntp.org
server 2.pool.ntp.org
# Only allow read-only access from localhost
restrict default noquery nopeer
restrict 127.0.0.1
restrict ::1
# Location of drift and log files
driftfile /var/lib/ntp/ntp.drift
logfile /var/log/ntp.log
# NOTE: If you run dhcpcd and have lines like 'restrict' and 'fudge' appearing
# here, be sure to add '-Y -N' to the dhcpcd_ethX variables in /etc/conf.d/net
Be sure to start the daemon, and to make it start automatically when the system boots.
On Arch Linux is:
/etc/rc.d/ntpd start on Debian and derivatives /etc/init.d/ntpd start
Update from the command line against a time server
You can update the clock manually, without the need of the daemon with
ntpdatentpdate 129.6.15.28
You will get something like this:
19 Apr 15:45:23 ntpdate[10948]: step time server 129.6.15.28 offset -45.697084 sec
Bonus: Set the time and Date on Gnome
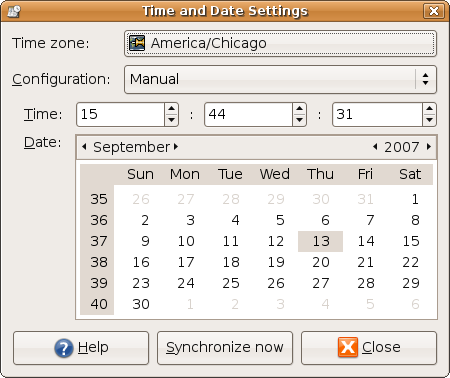
If you are using Gnome right click on the clock and select adjust, or go to: System > Administration > Time and Date (You may be asked for root password)
You will see a window similar to this one:
Saturday, 7 April 2018
Forgot Password CentOs
In this post will guide you simple steps to reset forgotten root password in RHEL, CentOS and Fedora Linux with example. There are various ways to reset root password which are.
- Booting into single user mode.
- Using boot disk and edit passwd file.
- Mount drive to another system and change passwd file.
Here, in this article we are going to review “Booting into single user mode” option to reset forgotten rootpassword.
Cautious: We urge to take backup of your data and try it out at your own risk.
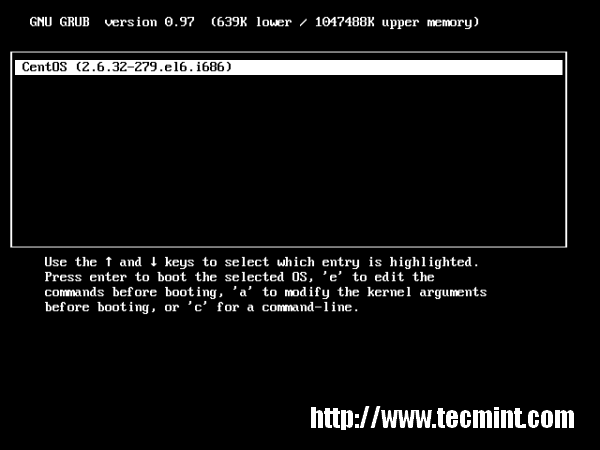
STEP 1. Boot Computer and Interrupt while booting at GRUB stage hitting ‘arrow‘ keys or “space bar“.
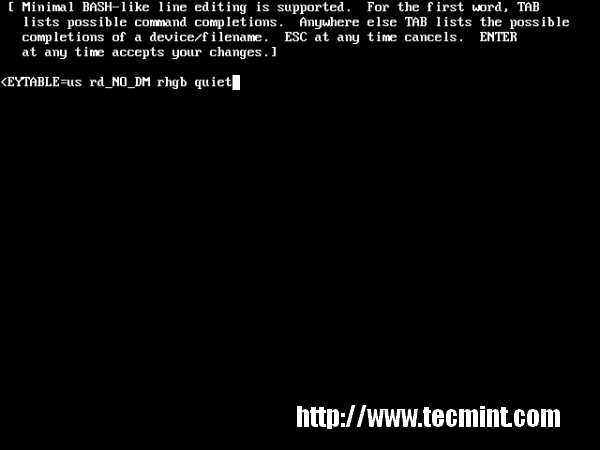
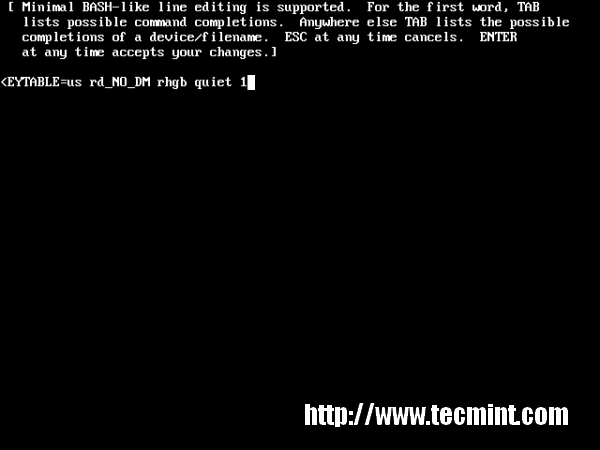
STEP 2. Type ‘a‘ to modify kernel argument. Anytime you can cancel typing ‘ESC‘ key.
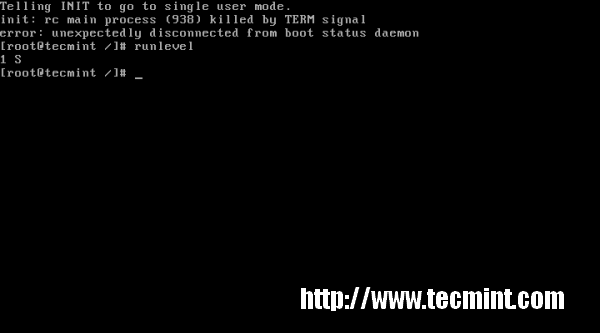
STEP 4. Type command “runlevel” to know the the runlevel where you are standing. Here “1 S” state that your are in a single user mode.
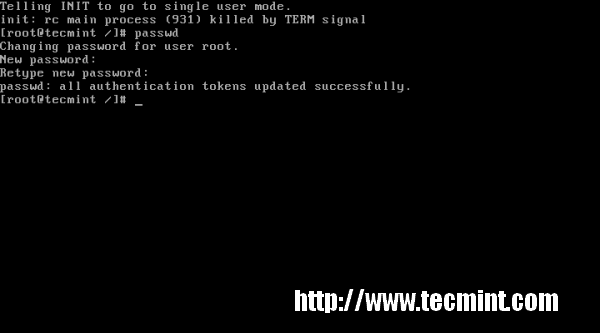
STEP 5. Type ‘passwd‘ command without username and press ‘Enter‘ key in command prompt. It’ll ask to supply new root password and re-type the same password for confirmation. “Your are Done” Congratulation!!!
What if GRUB bootloader is password protected? We’ll cover in our next article, how to protect GRUB with password and reset the same. Stay tuned…
If you find this article is helpful, or you may have some comments or query about it please feel free to contact with us through below comment box.
Source: https://www.tecmint.com/reset-forgotten-root-password-in-rhel-centos-and-fedora/
Subscribe to:
Comments (Atom)


